{this moment}

A Friday ritual: a single photo, unaccompanied by explanation, which captures “a simple, special, extraordinary moment…I want to pause, savor and remember.” ~SouleMama

**********

20140124_102427

**********

If you’re inspired to do the same, leave a link to your ‘moment’ in the comments for all to find and see.

For Later.

The snow is beginning to fall ever so gently (I do wonder how much we’ll get!), I’ve got a cup of tea just made, WV is asleep after an excellent play date with my good friend N and her three lovlies (and the dogs are, incidentally, having doggie dreams of their own), and so I thought I’d write a few things down. I don’t know about you, but it seems there is always a long list of things to do that just don’t get done around here. So much “upkeep,” so many creative projects, so much cleaning, so much writing. I welcome any advice on how other SAHMs/WAHMs structure the day to maximize efficiency and minimize exhaustion. One thing that has consistently helped us is meal planning…I’ve popped the sausages out of the freezer for tomorrow’s dinner…but I need to go further. While WV is napping, here is a small list of things planned…

CRAFTS.
I bought 49 yards (W pointed out that’s nearly half a football field’s worth) of fabric a few weeks ago and plan to get some serious sewing done. I have a couch and a chaise to recover and want to make roman shades for our bedroom. Will post a roman shade tutorial once I’m done because have you seen what’s out there? It’s not much (or good…Martha Stewart fail). I’ll surely procrastinate by making pillows and covering ottomans. Must find some ottomans.

I’d like to make my own nursing tanks (thanks, Pinterest!). This time, I’ll be more prepared to breast feed – nursing tanks are expensive, but tank tops are cheeeeap (I’m thinking Forever 21’s $2 tanks!).

Also, it’s probably time to make some more baby wipes. I hit up garage sales in the fall for receiving blankets that I will re-purpose as such.

WRITING.
W and I both have papers we want to complete from our recent degrees – we’ve thought about instituting an evening of writing once per week. Can’t decide if it should be staggered (ie one of us plays sitter) or if we should attempt to actually enforce a bed time and then write together. I like the latter idea.

We’d also like to more consistently post on this blog, and even revamp a bit. We’ve got 25+ posts in the queue that need a few hours before being set free. One on home loans. One on soups. One on inspiration. One on frugality. Several on our kitchen renovation and discovery of a secret room in our house. Even a few that we’d like to do a follow-up with (the cloth diaper post, for example); we’ve got a lot more to share in the “babies don’t cost that much” category.

WV’s birth story. Several friends of mine are currently pregnant and have asked about WV’s birth. It didn’t go as planned, I will say. And my doula and one of my midwives have suggested I get this done so that I can focus on the birth of E in the spring, afresh and with no baggage from my first labor and delivery. I want to do it. I just find it so hard. But I will.

I’ve connected with a blogger via my {this moment} posts who interviews writers each Wednesday. I’m working on her interview questions and will be featured on her Writer Wednesday sometime this spring!

COOKING.
Do I really need to say more? I have three biscotti recipes I’ve tinkered with that I want to share. A smattering of soups. And W is interested in branching out in the bread making department – his standard sandwich bread is like my quiche: memorized. Time to expand.

AROUND THE HOMESTEAD.
Oh, how the proverbial “to do” list on a homestead is a bottomless pit. Our number one priority is fencing. Lot’s of fencing. Some Morman friends I’ve made will be helping us when the ground isn’t frozen.

Make contact. We have several neighbors we need to drop in on to get to know better and to pick their brains.

Then there are lesser needs like: “what to do with the old smoke-house” (it’s a big shed…anyone? anyone?) and to prep the barn for goats and a milk cow I’ve already named Tallulah.

We also have to finish the kitchen.

Inspired by Wendell Berry, and many others, I must exclaim: homesteading requires you to be, at any given moment and all at once, an artist, an animal psychologist, a chef, an electrician, a gambler, a good neighbor, a plumber, a scientist, an even more sleep-deprived parent, a solver, a weather watcher, and a lover (and finder) of small victories.

Ok, nap over.
What’s on your to-do list? Good luck!

I’m linking up with The Prairie Homestead blog for another Homestead Barn Hop.

Fill-The-Barn-Fever

W and I are serious about using our new home and land to homestead, as it aligns with so many of our personal values. In and of itself, a complete (and long!) post, so I will leave the “why” for later and get straight to the point: we got pigs. Yep, sweet, little, strong-willed piggies. Frankly (haha), on my part, I’m sure being pregnant opens up a depth in my heart where things which before were cute now are achingly so, so I don’t pretend to be absolutely level headed about them (for example, I’d entertain knitting them a sweater, as per the influence of my friend N). I’ve got W for the level-headed part, and he was the one who found the Craigslist ad.

20140119_164107 (1) 20140120_082109

We’ve been planning on adding a milk cow and perhaps a steer to raise for meat to our burgeoning livestock, and almost did, this past weekend. But I messed up the time we were supposed to meet the farmer and later, some breed advice from W’s brother’s girlfriend, who is in vet school, made us happy we did. She pointed out that the two breeds we were to pick from – Jersey and Holstein – were notorious for unpredictability in males or used for meat by Taco Bell. Clearly, neither of which we wanted. We’re still looking, and plan on talking to our nearest neighbor, who has about 20 head of mixed colored cows and steers. We learned quickly from a chicken acquaintance that we definitely don’t want the trouble of raising a bull (our initial idea, we’re learning here) just to mate with a cow and then use for meat – there are far easier AI options; we’ll ask our neighbor.

Saturday night, W showed me an ad he found while browsing CL and the pig idea was born (did I ever doubt we’d get a pig eventually?). We spent precious hours in the wee part of the morning doing extensive research on the breeds and found they – Guinea Hogs and Kunekune – are literally the gentlest pigs you can find. The Kunekune is a New Zealand breed, which is exciting to me because, as some of you know, all of my graduate field work was in New Zealand and I have a great affection for the country. Both Heritage Breeds are exceptional for raising as family pigs because of their temperament and because they are not porkers, so to speak – they are smaller than the average hog.

We drove out to the farm in Providence Forge; 4 acres of happy pigs with a trailer in the middle. The older couple who lived there were so nice and pleasant and very knowledgeable – giving us lots of tips and tricks on where to get free bedding shavings, bread, and milk for their feed. All their pigs were named, and the woman kept saying things like, “Violet, stop shoving,” and “Stella where are you?- S-T-E-E-E-E-L-A?!?” Her ad had said that they only had 15- and 8- week old males, no females, but it turned out they did have females, and we on-the-spot retooled our plans: get a breeding pair (the litters were unrelated), and keep them to breed. We’ll keep a pig or two from their litters for meat and sell the rest.

20140120_082836Three days in and we’re in love. For now they are situated in our large chicken yard/coop (they are very social breeds and enjoy inter-species company). The little boy is twice as big (15-week litter) than the little girl and much more headstrong. He lives for corn treats and will not stop “snurffling” me until I give them to him (he figured out right quick there’s always corn in my pocket). The little girl eagerly follows him around, wagging her little piggy tail, and paying attention to the finer details – where he uses his snout, she uses her brain.

On their first full day here WV and I went to play with them early in the morning. We ended up panting over our misadventures. According to what I had read, they are natural and adept foragers, preferring grass in most cases to other food (perfect, we have a lot of grass and intend to fence off an acre to be used by them and the goats that are a-comin’). “Oh, I’ll let them out and they can follow us around on our usual red wagon rides while eating grass.” Wrong. The internet lied. And piglets are not kittens (oops!). They preferred freedom to grass and lit out across the field towards the woods with downright surprising speed! Dang, little piggies can run! I saw our investment melting away should they reach the forest, so I hauled my pregnant you-know-what after them, managing to reach them at our property line, and herd them back up the slope. Thank goodness I had corn in my pocket. We need a fence.

20140120_152028So, welcome to our new little piggies, Abe R’Ham and Beth L’Ham. We’re so glad you can help fill our barn with endless hours of amusement and generations of sweet little piggies, just like yourselves.

We’re linking up with The Prairie Homestead blog for her Homestead Barn Hop today! Head on over there for great recipes and self-sufficiency tips.

Replacing the Air Filter(s) In the Civic

Time for another automobile maintenance post for those who are following along. Was able to get this done before starting my new job and before the “heavy” snow arrived. This one is a two for one – the air filter AND the cabin air filter replacement. As most of my auto maintenance posts are, this one uses our 2009 Civic as the example, but this procedure is pretty straightforward and the same basic steps can be followed for most other vehicles.

Different manufacturers recommend different intervals on when to change your air filter. But the easy answer is to replace it when it gets dirty. I’m ashamed as to how long I waited, you can see the pictures below. The reason you need a filter is so dirt, dust, and other particles don’t get sucked into your engine, acting as abrasive little demons shortening the lifespan of your engine. The reason you need a clean air filter is because your engine needs a certain ratio of air (oxygen, really) to gasoline to operate efficiently. If your filter is too dirty then the flow of air is reduced, therefore making your mixture more rich with gasoline, causing you to use more gas than necessary to run your engine. So you want a clean filter.

If you don’t know how dirty the filter is, then take it out and look at it. If you don’t know where the filter is, crack open your user manual, check google, or just look for the tube that looks like it is sucking outside air into the engine. Here is where it is in the Civic:

image

A zoomed in look shows the clamps you have to unclamp:
image

Remove the filter housing, look at the filter, and decide whether it’s dirty enough to replace:

image

Put the new filter where the old one, put the housing back, re-clamp, and you’re done. Take a look at this side by side:
image

The second part of this post involves the cabin air filter replacement. This is important because it keeps harmful particles out of your AC system and also out of your lungs. Check your manual for where it is; it’s normally behind the glove box. Here is the step by step shown in pictures:

Press the sides where the glove box connects to the dash. Some cars you need a screwdriver or socket wrench:

image

Ensure you have emptied the contents of your glove box or else they will end up on your floor. Behind the glove box is the housing for the cabin air filter. In the Civic, just press these side tabs and pull out.

image

Here’s the old one next to the new one:

image

Make sure your filter is installed properly (look at the arrows on the filter and the housing):
image
image

Pretty simple stuff, huh? Took me about 5 minutes, mainly because I had to stop and snap pictures.

Breakfast, Lunch, and Dinner.

Alright, so these weren’t back-to-back in our household, but they could be. Walter and I have been cooking a lot more around here and really enjoying the results – I wanted to virtually share the tastiness!

BREAKFAST
Ah-Mazing Cranberry Banana Muffins and/or Traditional Banana Muffins.

P1070650 The first recipe is, by gosh, the best muffin recipe I’ve ever made. It is not banana heavy, in fact the banana is just for moisture, and doesn’t really come out in the flavor. It calls for half a banana, but I doubled the recipe to use a whole one. I found (and tweaked) it in a cookbook from my mom called “The Greyston Bakery Cookbook: Gourmet Specialties from the Zen Community of New York.” That made me smile, the zen part. My mom also noted on the page: “7/22/90, Excellent Muffins” with “Excellent” underlined twice. I have to agree. There is something about the tartness of a cranberry baked into a moist sweet cake that, well, there’s no English word for it I guess.

Then I was searching for a recipe that would enable me to unload THE REST of the dead bananas in this house. WV is a banana-lover, but I guess his mama overcompensates and buys too many bananas. Doubling this recipe took care of the 6 and a half mushy black bananas I had.

So yes, I made double both these recipes in one day. I feel I often undertake a little more than really needs to be accomplished at once…but the result was something like 50 muffins (a few may have “disappeared”), half in the freezer for when E is born, so that’s not so bad.

LUNCH.
Got-Some-Eggs?-Quiche with Olive Oil Crust

P1070620 P1070590

Since we’ve been keeping chickens, my go-to recipe has been a quiche so easy that the recipe is now memorized, ready to whip up on a moment’s notice. The super-simple olive oil crust was the idea of my friend and past neighbor, K; I had never heard of such a crust! It’s so great, though – the olive oil makes it such that there is no need to grease the pan, the quiche cuts up and comes out cleanly. Our pullets from the fall are starting to lay and I’m either going to start a quiche factory or perhaps branch out…lemon meringue pie?

You can put anything in a quiche, by the way – it is so versatile – a veritable mulligan pie. My “usuals” are either sauteed swiss chard and onions (spring), broccoli and cheddar cheese (summer), or diced potatoes, tomatoes and feta or Gruyere (winter). You can pretty-it-up with sliced cherry tomatoes or basil leaves. And you can make them meaty, sweeter, or more savory…sky’s the limit!

DINNER
Curried Lentil-Stuffed Peppers

P1070616 This recipe just happened, and it turned out great. W got a Groupon for Sam’s Club that basically amounted to getting every dollar back that we spent (in coupons and free chicken), so we took the plunge (instead of opting to continue to borrow family members’ Costco cards). But we’ve been unimpressed with the selection, quality and customer service. The only thing good from there, so far, has been a 6-pack of giant green bell peppers (which makes me totally crave our garden to hurry up and get going). Two things to pass along, regardless of how you stuff ’em: 1) I highly endorse steaming or blanching your peppers pre-stuffing – they’ll bake faster and be very tender and yet, oxymoronically, still retain a resident crunch. And 2) Add raisins. Always, add raisins.

Bon Appetite!

Polar Vortex Planting.

Single digit degree weather is the perfect time to plant lettuce…indoors.

Over New Year’s a friend was interested in how I double the lettuce I buy by regrowing it after I eat it! I thought I’d share my technique with you to save you money and green up your blistering cold winter, too. It escapes me who first showed me this neat trick.

P1070606First, I buy organic romaine hearts. Instead of ripping off the leaves, I cleanly chop off the bottoms, then score them and put them in a bowl of water for a few days to begin rooting and sprouting. After 24 hours you will see the new growth, which is pretty sweet. After a week, you’ll notice tiny rootlets sprouting from odd places on the bottom nubbin. I change out the water so it doesn’t get yucky as frequently as I can. After two weeks (or so, as in the pic directly below), they’re ready to plant in soil.

P1070603 P1070608

In our county, even though plastic produce containers are labeled as recyclable, they are not, so I’ve been saving them for seed starting. WV and I punched a few holes into the bottoms and cut off their tops, to be used as drain trays. Then we filled the containers about 2/3 of the way full with dirt (after we defrosted it by a vent for most of the day), planted the growing lettuces I’ve had sitting by the sink and some seed lettuce as well! We had fun making a little bit of a mess inside, since it was too cold to go outside and dig in the dirt.

Keep them well watered, in full sun (if possible) and harvest when you see fit! Mine don’t seem to ever achieve the size of the originals, but they get close.

And it’s like there’s a little bit of spring in here; houseplants and giant cactii do not have the same aura as veggies growing.

How To Change Your Motor Oil

P1070573
Ok, I know this might be rudimentary for many of you readers out there, however, with the unexpected popularity of my post on changing the third brake light, I figured why not? My reason for writing that post was to reach at least one person to save him or her from unnecessarily spending too much money, so that same reasoning applies here.

If you have never changed your oil before, fear not! This is one of the easiest jobs to do yourself, there is very little risk of screwing things up, and you’ll be able to save yourself a bunch of money! All you need are a few tools, some elbow grease, and about a half hour and you can be a back yard mechanic too. It’s also a great father/son bonding experience (my dad taught me, his dad taught him, I’m sure Sr. taught Jr., and I’ll teach WV when he’s a couple years older).

In this post, I will show you how I change the oil in our 2009 Honda Civic. Different manufacturers (and even different models from the same manufacturer) will have things moved around a bit, but the basic principles still apply. Bottom line up front, here are the steps (explained in further detail below):

Step 1: Elevate the front of the vehicle.
Step 2: Remove drain plug, let oil drain into pan, replace drain plug.
Step 3: Remove filter, let oil drain into pan, replace filter.
Step 4: Refill engine with new oil.
Step 5: Clean up.
Step 6: Check for leaks.

P1070581
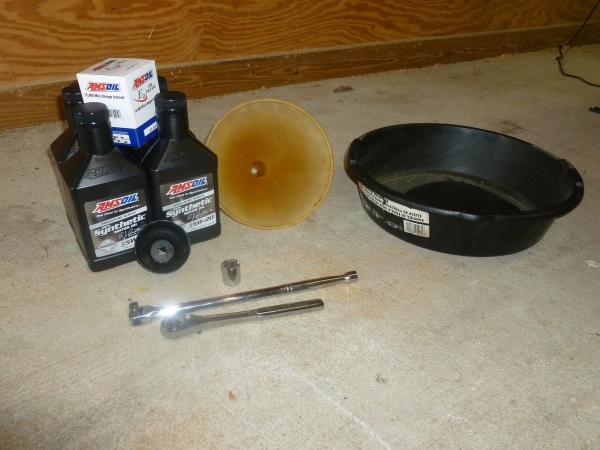
Here’s a list of what you need:
Ramps or jack stands
Oil pan (that can handle the volume of oil in your engine)
Socket wrench (our Civic takes a 17 mm socket)
Towels/rags
Replacement filter
Replacement oil
Funnel (optional)
Filter wrench (optional)

If you’re not sure what weight/volume of oil or filter type your car needs, consult your owner’s manual. If you cannot find your manual (or the information), then Amsoil has a pretty good app to find out what you need (assuming your vehicle is a 1980 or newer). You don’t have to go with Amsoil for your oil and filter, but the site tells you what your car needs so you can get whatever brand you prefer. Plus, it gives you the option to choose metric or not, so you normal people who use a base 10 measuring system and us silly Americans with our nonsense measuring system can all get the right volumes (1 qt ≈ 0.946 L).

Step 1: Elevate the front of the vehicle. I use ramps. You can get a good pair for around $50, check your local AutoZone/Advance/Pep Boys/etc. Some people prefer to use jack stands, but I think they’re too much of a hassle for changing oil; it’s much easier to set out ramps and drive on up. Heck, you could drive one side of your car onto the curb if you feel like it (and you have a curb). Whatever you do, make sure that the car is secure (parking break on ramps!) before you go crawling underneath it. DO NOT CRAWL UNDERNEATH THE CAR IF IT IS ONLY SUPPORTED BY JACKS. Get yourself some jack stands or ramps, it’s not worth the risk to save a few bucks and be crushed by a car.
P1070574

Step 2: Make sure the engine is warmed up, but not hot. If you’ve been driving around, put the front end up and let it sit for a while. The oil can get really hot and burn your hands. On the other hand, if it’s really freaking cold outside and the oil has just been chilling (literally) in your engine, then you want to crank the engine and let it run for a bit so the oil flows a little better. Position your oil pan underneath the drain plug, keeping in mind that the laws of physics (gotta love fluid dynamics!) will ensure that the oil will initially shoot farther in the x-direction (using the ground as the x-axis, x = 0 is the point on the x-axis directly below the drain plug) and the stream will gradually move back towards x = 0 as the engine drains. It doesn’t matter which way you define as positive, you don’t want the oil to overshoot the pan. Loosen the drain plug with the socket wrench, and then slowly twist it out with your fingers, keeping pressure against the plug so it doesn’t shoot out and get lost in the oil pan.
P1070580

P1070582

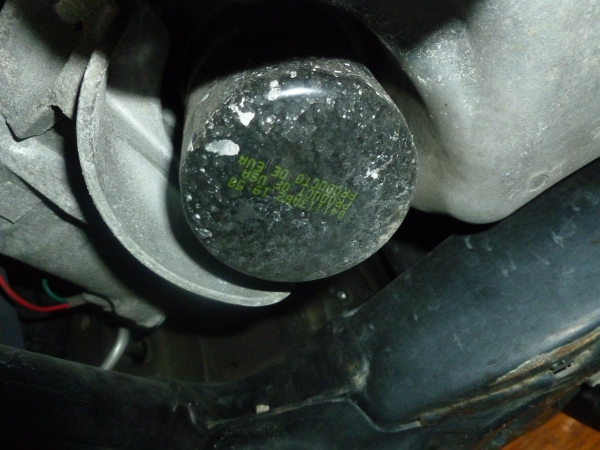
Once the oil is done draining, clean up the drain plug, clean around the area where the drain plug goes, and screw it back in there (you can use a torque wrench, but a normal-strengthed person with a normal socket wrench will most likely not over-tighten the plug). Some peoplemanufacturers recommend replacing the drain plug each time you replace the oil. Some cars also have a crush washer that goes between the oil pan and the drain plug that crushes (hence the name) when you tighten the plug and prevents the plug from getting even tighter. Manufacturers also recommend to replace these each time*. The first time I changed the oil in the Civic, I threw away the crush washer. I am still using the same drain plug. See any evidence of leakage in the picture above?

Step 3: Using the filter wrench (or a leather belt, or your hands if you’re Paul Bunyan), loosen the filter, then slowly twist it out using your hand(s). Be sure to keep pressure in the opposite direction, though, otherwise as soon as that filter comes free of the threads, it will slip out of your oily hands and plop right into your oil pan, splashing oil everywhere (yes, I know this from experience). Let the oil drain out of there, wipe out around where the filter screws in, then dip your finger into the used motor oil and spread it around the new filter’s gasket (to ensure a proper seal), and screw the new filter into place. I normally go hand tight (not so I’m straining) plus 1/4 turn with the wrench. Look at all that nastiness from the winter roads on the filter…
P1070579

Step 4: Double check that you put the drain plug back in (again, speaking from experience). Locate on your engine (under the hood) where the motor oil goes, and unscrew the cap. Using a funnel (or very steady hands), pour the new oil into the opening. My grandfather (and father, and now me) always said “You pay for the oil in the bottom of the bottle,” so I let the bottle sit there and REALLY drain. Screw the cap back on, close the hood, and you’re good to go.
P1070583
P1070585

Step 5: Clean up. I transfer the used motor oil into an older container (you could even use the oil bottles you just emptied), stuff the old filter with paper towel, put it back in the box, and put it in a plastic bag with the hole facing upwards so residual oil doesn’t come out. Most shops and municipal waste collection facilities can recycle old oil and filters for you – call around and check. And look at how clean that new oil is compared to the old!

P1070587 P1070588

Step 6: Bring the front end of your car back down to the ground, crank it up, check for leaks. I normally let the engine run for about 10 minutes, check underneath for leaks, then check the level with the dipstick. If I did it right, I’ve got the exact level of oil I need. If I didn’t, I either need to drain some or add some (it’s a lot easier to add, so better to undershoot). Take it for a spin (or just leave it running for a few minutes) and come back and re-check for leaks.

I will say, I’m so glad that I finally have my own garage. For the past few years I have had to change the oil (and do all other car maintenance) completely outside. And it always seemed like I chose the windiest day of the year to change the oil. Now I can do my work INSIDE A GARAGE and be somewhat protected from the elements. And eventually I’ll insulate it so I can stay warm in the winter and cool in the summer!

It’s entirely up to you whether you want to use conventional or synthetic oil in your vehicle. I use synthetic, since the Amsoil synthetic is good for 25k miles or 1 year, whichever comes first. A little more expensive up front, but the savings do add up. For full synthetic and the filters (the Amsoil filters for the Civic are only good for 15k miles, so I get two), the total cost comes out to about $60. That’s it. For the entire year. Most shops (at least around here) charge between $20-$30 for a conventional oil change, which has to be done every 3,000 miles. If you drive 15k miles in a year, that’s between $100-$150 you’re spending a year on oil changes. If you’re driving 24k miles a year, you’re up at $160-$240 a year. Even with the up front cost of buying ramps ($50) and tools ($10-$20) you’re spending less in that first year, and the savings add up for each subsequent change. Not to mention saving you the hassle of dropping your car off, waiting, or getting someone else to pick you up and bring you back, and losing the whole day.

So if you’ve never changed your own oil before, go ahead and give it a try. It’s not terribly difficult, and it’s really hard to screw it up. It takes less time and money than taking it to the shop, and it gives you that nice sense of accomplishment of doing something yourself and sticking it to the man!

———————
*I have a hypothesis that stealerships and garages just take an impact wrench to the drain plug and the crush washer prevents them from torquing (not twerking) so hard that the oil pan cracks. This is also why manufacturers recommend replacing the washer and drain plug, because they know people will torque the hell out of them and render them non-reusable. The first time I changed L’s oil in her car when we were dating, I was doing pull-ups on the breaker bar trying to get the dang plug to turn! The manufacturer recommendation is about 30 ft-lbs. At the time, I was about 180 lbs, give or take 5. My breaker bar is 18 inches.