A Month of China-free: A challenge.

I look around me and wonder about the provenance of the things we own. Partially, I’m interested in our “stuff” because one of my hobbies is garage-saleing and thrifting – I’d rather buy almost everything used (reasonable exceptions: underwear, cars). Where did it reside before we owned it? Was it well loved or neglected? How can it be repurposed? The thrill of the hunt is fun and you never know what you might find. But I’m also curious about where things come from for political, humanitarian, and sustainability reasons. And what I’ve become aware of over the last several years is alarming: it’s ALL made in China. Insidiously, we’ve stepped onto this train as consumers with a purchasing muscle memory, not bothering to check the destination…and it’s the wrong train. Many of the things I use, value, and decorate with are made in China. I’ve checked. My coffee maker? Yup. This computer. Yes. The outer shell of the cloth diapers I lovingly diaper my kids with? “Responsibly” made there. The Tom’s shoes I wear (yup, that Tom’s – the ones that aren’t just foot coverings but hipster humanitarian statements)? YES, Tom’s are made in China. Start checking the bottoms of or the labels of things – you are going to find something that surprises you, guaranteed.

I’m depressed by the mass quantities of *things* made in China. Cheap plastic crap begets the “more is more” consumerist mentality that pervades our culture, and even worse, this begets the blind eye that is turned on the ethics involved in sending production overseas. Have you read the recent article about a college professor who was jailed in China and forced to work in a labor camp, the products of which were for an unsuspecting American company? China’s judicial system is fraught with shortcomings, and one is that you are guilty until proven innocent. The SCOTUS decision this week is an excellent example of the consumer-fueled rampant corporate hypocrisy that “Made in China” represents. Not only does Hobby Lobby sell things – oodles of things – made there (clearly their Christian values are in deference to corporate profits), but they hold stock in the very companies that produce the contraceptives they object to covering on religious grounds. I feel compelled to depress you, too, with these injustices because knowledge is power. As Maya Angelou said, “Now that I know better, I do better.”

There’s a whole other level to my “Made in China” hyperventilation, who’s surface is hard to scratch. Many products with a USA/Canada/name another country COOL (Country Of Origin Labeling) are sent to China, packaged, and then shipped back to that COOL. Laws governing how to label the trans-Atlantic flights your stuff (and food! – many chickens take this route) takes are lenient or non-existent. You may never truly know how much jet fuel the meal on your plate or the plastic in your “Made in the USA” stuff actually used. Also, China doesn’t have the greatest food safety reputation.

I have little faith that “ethically produced/made” in China actually exists. There is no getting around the serious human rights violations pervasive in this country that are inextricably endorsed by us when we buy from companies that outsource to China. Perhaps a worker gets a living wage, laughable, but possible. But that does not retract from the ever present elephant in the room – China’s complicated and deeply flawed One-Child Policy. It has engendered infanticide, one of the highest rates of abortion in any country, forced abortions and sterilizations, and suicides. In my estimation, it stands in history as gravely horrific as the Holocaust. There is nothing more.

**********

So. Every now and then on Facebook, I see a friend or a farm running a 30-day challenge – decluttering, spending more time out-doors, budgeting and being thrifty. I thought long and hard about something I’d like to do more purposefully and here it is: I will make a great effort to not knowingly buy anything made in China this month and beyond (truly, I’ve been trying to do this for some time now). I don’t want to be part of the chain that ends in a place where human and animal rights are brutally marginalized. We celebrate 238 years of freedom this month…I’ll be doing it by only buying things made in the good ole’ U.S.A. I don’t mean this to be a plague of austerity in our lives, but rather a concerted effort to value where and by whom products are made – I’m aware that some things that we “need” are solely manufactured there, and often the things I buy used are as well. But, I’ll repurpose, reuse, recycle, all to reduce my family’s dependence on things made in China. I challenge you to join me this month.

Happy Birthday, United States.

Shed Updates.

One of the fun things about buying a house is that when you’re handed the keys, you are handed a blank slate. Whether that simply means you slap on a coat of paint, redecorate, or gut things, it’s your prerogative.

20140203_093555Our homestead came with four outbuildings – a barn (that needs some work), a stellar chicken coop (that we’ve revamped and filled with chickens), and two dilapidated sheds. We’ve cleaned out and filled up one of the sheds (it was a disgusting job – the former owner had used it as his duck massacring station…and had left it mid-massacre). We believe the other shed was formerly a smoke house – it’s got a chimney and rafters (currently from which snake skins hang). It’s 11 feet by 11 feet, has two windows which have been sided over, the floor is spotty in some places, and we believe it has electricity run to it (need to test that). So, what to do with this shed is a project that’s been on my mind – I’d like to un-dilapidate it and give it a new life. We’ve been tossing around ideas, but haven’t settled on anything.

These ideas include:

1. Secondary tool and gardening shed, womp, womp. This just isn’t what I want to do: have two sheds. We need something more interesting, unusual, with pizzazz.

2. Potting shed. I like this idea, but don’t really know if I need an entire shed devoted to potting – right now I already have a little outdoor potting area set up and it suits me just fine. Turning the shed into a potting shed mostly conjures up images of dank, musty, dirt. Hmph.

3. Green house retrofit. This would probably be the most work because it would require taking a significant part of the shed apart – including the roof – to replace with glass…although I guess we could do a partial roof removal. I think we’ll wait and build one from scratch, later.

4. Cozy guest house. I know, this seems impractical, especially since we have several in-house guest options. But isn’t this romantic? We could call it the The Shedroom!

5. Animal housing. On the other hand, this seems quite practical…however the shed is very close to the house and driveway, and I’d rather just keep filling the barn. W has been interested in raising rabbits, and this could be an excellent start to a large hutch/husbandry outfit. BUT I had pet rabbits growing up and just can’t imagine us venturing into rabbits for meat.

6. Restore it to it’s former glory: a smokehouse! Another one of W’s craaazy ideas. Do we need a whole structure devoted to smoking meat? Haha, I bet some of you will say “YES!” I guess if W starts hunting it would make sense…perhaps the electricity would come in handy because we could keep a chest freezer out there too.

7. Studio/craft space. Turn it into a retreat where we can craft (all those reupholstering jobs I have on my to-do list). This is rustic, re-purposed and glamorous all at once (and a tad more grande than our actual shed could probably accommodate, oh Pinterest!). I could bring my craft closet out there. I could set up my sewing machine. Buuut, then I wouldn’t be in the house, so what would my little guy do while I crafted? And if he was napping, would I really want to leave the house to go to my craft shed? Yea, no.

So, what do you think? What have you done to re-purpose an old shed or structure on your property? Any other ideas?

Thanks in advance for your input!

I’m linking up with The Prairie Homestead blog for another Homestead Barn Hop.

For Later.

The snow is beginning to fall ever so gently (I do wonder how much we’ll get!), I’ve got a cup of tea just made, WV is asleep after an excellent play date with my good friend N and her three lovlies (and the dogs are, incidentally, having doggie dreams of their own), and so I thought I’d write a few things down. I don’t know about you, but it seems there is always a long list of things to do that just don’t get done around here. So much “upkeep,” so many creative projects, so much cleaning, so much writing. I welcome any advice on how other SAHMs/WAHMs structure the day to maximize efficiency and minimize exhaustion. One thing that has consistently helped us is meal planning…I’ve popped the sausages out of the freezer for tomorrow’s dinner…but I need to go further. While WV is napping, here is a small list of things planned…

CRAFTS.
I bought 49 yards (W pointed out that’s nearly half a football field’s worth) of fabric a few weeks ago and plan to get some serious sewing done. I have a couch and a chaise to recover and want to make roman shades for our bedroom. Will post a roman shade tutorial once I’m done because have you seen what’s out there? It’s not much (or good…Martha Stewart fail). I’ll surely procrastinate by making pillows and covering ottomans. Must find some ottomans.

I’d like to make my own nursing tanks (thanks, Pinterest!). This time, I’ll be more prepared to breast feed – nursing tanks are expensive, but tank tops are cheeeeap (I’m thinking Forever 21’s $2 tanks!).

Also, it’s probably time to make some more baby wipes. I hit up garage sales in the fall for receiving blankets that I will re-purpose as such.

WRITING.
W and I both have papers we want to complete from our recent degrees – we’ve thought about instituting an evening of writing once per week. Can’t decide if it should be staggered (ie one of us plays sitter) or if we should attempt to actually enforce a bed time and then write together. I like the latter idea.

We’d also like to more consistently post on this blog, and even revamp a bit. We’ve got 25+ posts in the queue that need a few hours before being set free. One on home loans. One on soups. One on inspiration. One on frugality. Several on our kitchen renovation and discovery of a secret room in our house. Even a few that we’d like to do a follow-up with (the cloth diaper post, for example); we’ve got a lot more to share in the “babies don’t cost that much” category.

WV’s birth story. Several friends of mine are currently pregnant and have asked about WV’s birth. It didn’t go as planned, I will say. And my doula and one of my midwives have suggested I get this done so that I can focus on the birth of E in the spring, afresh and with no baggage from my first labor and delivery. I want to do it. I just find it so hard. But I will.

I’ve connected with a blogger via my {this moment} posts who interviews writers each Wednesday. I’m working on her interview questions and will be featured on her Writer Wednesday sometime this spring!

COOKING.
Do I really need to say more? I have three biscotti recipes I’ve tinkered with that I want to share. A smattering of soups. And W is interested in branching out in the bread making department – his standard sandwich bread is like my quiche: memorized. Time to expand.

AROUND THE HOMESTEAD.
Oh, how the proverbial “to do” list on a homestead is a bottomless pit. Our number one priority is fencing. Lot’s of fencing. Some Morman friends I’ve made will be helping us when the ground isn’t frozen.

Make contact. We have several neighbors we need to drop in on to get to know better and to pick their brains.

Then there are lesser needs like: “what to do with the old smoke-house” (it’s a big shed…anyone? anyone?) and to prep the barn for goats and a milk cow I’ve already named Tallulah.

We also have to finish the kitchen.

Inspired by Wendell Berry, and many others, I must exclaim: homesteading requires you to be, at any given moment and all at once, an artist, an animal psychologist, a chef, an electrician, a gambler, a good neighbor, a plumber, a scientist, an even more sleep-deprived parent, a solver, a weather watcher, and a lover (and finder) of small victories.

Ok, nap over.
What’s on your to-do list? Good luck!

I’m linking up with The Prairie Homestead blog for another Homestead Barn Hop.

Replacing the Air Filter(s) In the Civic

Time for another automobile maintenance post for those who are following along. Was able to get this done before starting my new job and before the “heavy” snow arrived. This one is a two for one – the air filter AND the cabin air filter replacement. As most of my auto maintenance posts are, this one uses our 2009 Civic as the example, but this procedure is pretty straightforward and the same basic steps can be followed for most other vehicles.

Different manufacturers recommend different intervals on when to change your air filter. But the easy answer is to replace it when it gets dirty. I’m ashamed as to how long I waited, you can see the pictures below. The reason you need a filter is so dirt, dust, and other particles don’t get sucked into your engine, acting as abrasive little demons shortening the lifespan of your engine. The reason you need a clean air filter is because your engine needs a certain ratio of air (oxygen, really) to gasoline to operate efficiently. If your filter is too dirty then the flow of air is reduced, therefore making your mixture more rich with gasoline, causing you to use more gas than necessary to run your engine. So you want a clean filter.

If you don’t know how dirty the filter is, then take it out and look at it. If you don’t know where the filter is, crack open your user manual, check google, or just look for the tube that looks like it is sucking outside air into the engine. Here is where it is in the Civic:

image

A zoomed in look shows the clamps you have to unclamp:
image

Remove the filter housing, look at the filter, and decide whether it’s dirty enough to replace:

image

Put the new filter where the old one, put the housing back, re-clamp, and you’re done. Take a look at this side by side:
image

The second part of this post involves the cabin air filter replacement. This is important because it keeps harmful particles out of your AC system and also out of your lungs. Check your manual for where it is; it’s normally behind the glove box. Here is the step by step shown in pictures:

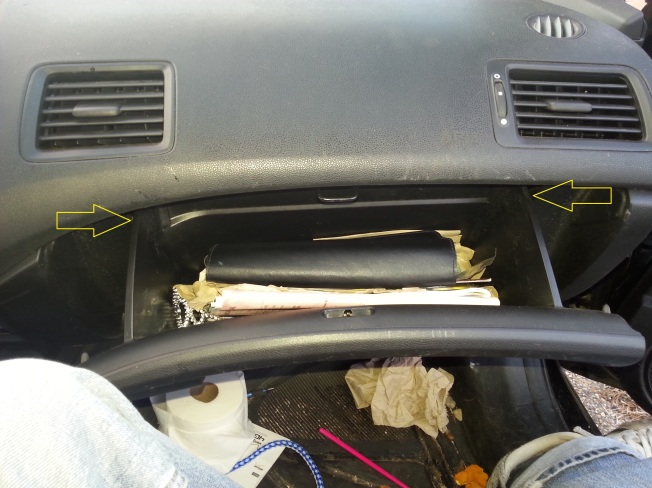
Press the sides where the glove box connects to the dash. Some cars you need a screwdriver or socket wrench:

image

Ensure you have emptied the contents of your glove box or else they will end up on your floor. Behind the glove box is the housing for the cabin air filter. In the Civic, just press these side tabs and pull out.

image

Here’s the old one next to the new one:

image

Make sure your filter is installed properly (look at the arrows on the filter and the housing):
image
image

Pretty simple stuff, huh? Took me about 5 minutes, mainly because I had to stop and snap pictures.

How To Change Your Motor Oil

P1070573
Ok, I know this might be rudimentary for many of you readers out there, however, with the unexpected popularity of my post on changing the third brake light, I figured why not? My reason for writing that post was to reach at least one person to save him or her from unnecessarily spending too much money, so that same reasoning applies here.

If you have never changed your oil before, fear not! This is one of the easiest jobs to do yourself, there is very little risk of screwing things up, and you’ll be able to save yourself a bunch of money! All you need are a few tools, some elbow grease, and about a half hour and you can be a back yard mechanic too. It’s also a great father/son bonding experience (my dad taught me, his dad taught him, I’m sure Sr. taught Jr., and I’ll teach WV when he’s a couple years older).

In this post, I will show you how I change the oil in our 2009 Honda Civic. Different manufacturers (and even different models from the same manufacturer) will have things moved around a bit, but the basic principles still apply. Bottom line up front, here are the steps (explained in further detail below):

Step 1: Elevate the front of the vehicle.
Step 2: Remove drain plug, let oil drain into pan, replace drain plug.
Step 3: Remove filter, let oil drain into pan, replace filter.
Step 4: Refill engine with new oil.
Step 5: Clean up.
Step 6: Check for leaks.

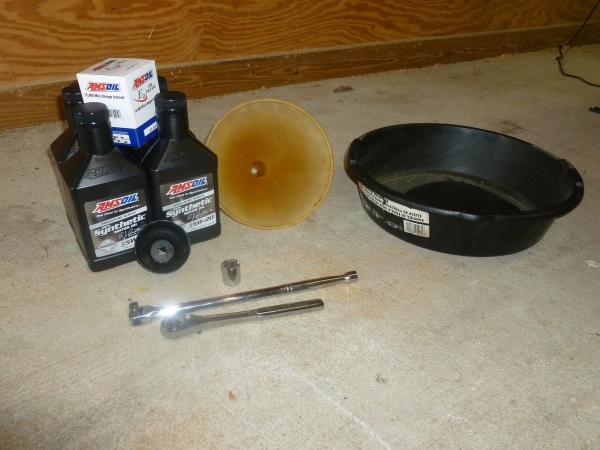
P1070581Here’s a list of what you need:
Ramps or jack stands
Oil pan (that can handle the volume of oil in your engine)
Socket wrench (our Civic takes a 17 mm socket)
Towels/rags
Replacement filter
Replacement oil
Funnel (optional)
Filter wrench (optional)

If you’re not sure what weight/volume of oil or filter type your car needs, consult your owner’s manual. If you cannot find your manual (or the information), then Amsoil has a pretty good app to find out what you need (assuming your vehicle is a 1980 or newer). You don’t have to go with Amsoil for your oil and filter, but the site tells you what your car needs so you can get whatever brand you prefer. Plus, it gives you the option to choose metric or not, so you normal people who use a base 10 measuring system and us silly Americans with our nonsense measuring system can all get the right volumes (1 qt ≈ 0.946 L).

Step 1: Elevate the front of the vehicle. I use ramps. You can get a good pair for around $50, check your local AutoZone/Advance/Pep Boys/etc. Some people prefer to use jack stands, but I think they’re too much of a hassle for changing oil; it’s much easier to set out ramps and drive on up. Heck, you could drive one side of your car onto the curb if you feel like it (and you have a curb). Whatever you do, make sure that the car is secure (parking break on ramps!) before you go crawling underneath it. DO NOT CRAWL UNDERNEATH THE CAR IF IT IS ONLY SUPPORTED BY JACKS. Get yourself some jack stands or ramps, it’s not worth the risk to save a few bucks and be crushed by a car.
P1070574

Step 2: Make sure the engine is warmed up, but not hot. If you’ve been driving around, put the front end up and let it sit for a while. The oil can get really hot and burn your hands. On the other hand, if it’s really freaking cold outside and the oil has just been chilling (literally) in your engine, then you want to crank the engine and let it run for a bit so the oil flows a little better. Position your oil pan underneath the drain plug, keeping in mind that the laws of physics (gotta love fluid dynamics!) will ensure that the oil will initially shoot farther in the x-direction (using the ground as the x-axis, x = 0 is the point on the x-axis directly below the drain plug) and the stream will gradually move back towards x = 0 as the engine drains. It doesn’t matter which way you define as positive, you don’t want the oil to overshoot the pan. Loosen the drain plug with the socket wrench, and then slowly twist it out with your fingers, keeping pressure against the plug so it doesn’t shoot out and get lost in the oil pan.
P1070580

P1070582

Once the oil is done draining, clean up the drain plug, clean around the area where the drain plug goes, and screw it back in there (you can use a torque wrench, but a normal-strengthed person with a normal socket wrench will most likely not over-tighten the plug). Some peoplemanufacturers recommend replacing the drain plug each time you replace the oil. Some cars also have a crush washer that goes between the oil pan and the drain plug that crushes (hence the name) when you tighten the plug and prevents the plug from getting even tighter. Manufacturers also recommend to replace these each time*. The first time I changed the oil in the Civic, I threw away the crush washer. I am still using the same drain plug. See any evidence of leakage in the picture above?

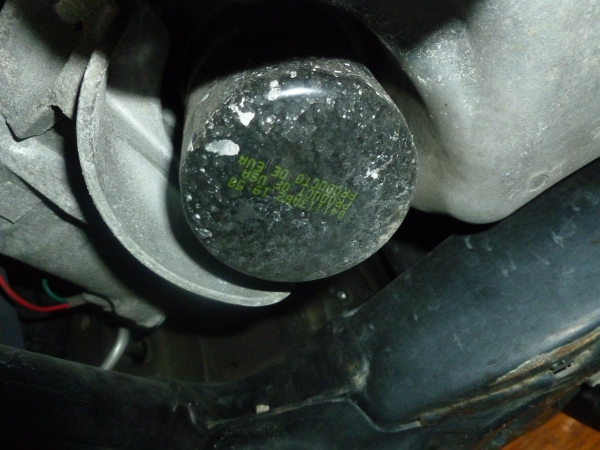
Step 3: Using the filter wrench (or a leather belt, or your hands if you’re Paul Bunyan), loosen the filter, then slowly twist it out using your hand(s). Be sure to keep pressure in the opposite direction, though, otherwise as soon as that filter comes free of the threads, it will slip out of your oily hands and plop right into your oil pan, splashing oil everywhere (yes, I know this from experience). Let the oil drain out of there, wipe out around where the filter screws in, then dip your finger into the used motor oil and spread it around the new filter’s gasket (to ensure a proper seal), and screw the new filter into place. I normally go hand tight (not so I’m straining) plus 1/4 turn with the wrench. Look at all that nastiness from the winter roads on the filter…
P1070579

Step 4: Double check that you put the drain plug back in (again, speaking from experience). Locate on your engine (under the hood) where the motor oil goes, and unscrew the cap. Using a funnel (or very steady hands), pour the new oil into the opening. My grandfather (and father, and now me) always said “You pay for the oil in the bottom of the bottle,” so I let the bottle sit there and REALLY drain. Screw the cap back on, close the hood, and you’re good to go.
P1070583
P1070585

Step 5: Clean up. I transfer the used motor oil into an older container (you could even use the oil bottles you just emptied), stuff the old filter with paper towel, put it back in the box, and put it in a plastic bag with the hole facing upwards so residual oil doesn’t come out. Most shops and municipal waste collection facilities can recycle old oil and filters for you – call around and check. And look at how clean that new oil is compared to the old!

P1070587 P1070588

Step 6: Bring the front end of your car back down to the ground, crank it up, check for leaks. I normally let the engine run for about 10 minutes, check underneath for leaks, then check the level with the dipstick. If I did it right, I’ve got the exact level of oil I need. If I didn’t, I either need to drain some or add some (it’s a lot easier to add, so better to undershoot). Take it for a spin (or just leave it running for a few minutes) and come back and re-check for leaks.

I will say, I’m so glad that I finally have my own garage. For the past few years I have had to change the oil (and do all other car maintenance) completely outside. And it always seemed like I chose the windiest day of the year to change the oil. Now I can do my work INSIDE A GARAGE and be somewhat protected from the elements. And eventually I’ll insulate it so I can stay warm in the winter and cool in the summer!

It’s entirely up to you whether you want to use conventional or synthetic oil in your vehicle. I use synthetic, since the Amsoil synthetic is good for 25k miles or 1 year, whichever comes first. A little more expensive up front, but the savings do add up. For full synthetic and the filters (the Amsoil filters for the Civic are only good for 15k miles, so I get two), the total cost comes out to about $60. That’s it. For the entire year. Most shops (at least around here) charge between $20-$30 for a conventional oil change, which has to be done every 3,000 miles. If you drive 15k miles in a year, that’s between $100-$150 you’re spending a year on oil changes. If you’re driving 24k miles a year, you’re up at $160-$240 a year. Even with the up front cost of buying ramps ($50) and tools ($10-$20) you’re spending less in that first year, and the savings add up for each subsequent change. Not to mention saving you the hassle of dropping your car off, waiting, or getting someone else to pick you up and bring you back, and losing the whole day.

So if you’ve never changed your own oil before, go ahead and give it a try. It’s not terribly difficult, and it’s really hard to screw it up. It takes less time and money than taking it to the shop, and it gives you that nice sense of accomplishment of doing something yourself and sticking it to the man!

———————
*I have a hypothesis that stealerships and garages just take an impact wrench to the drain plug and the crush washer prevents them from torquing (not twerking) so hard that the oil pan cracks. This is also why manufacturers recommend replacing the washer and drain plug, because they know people will torque the hell out of them and render them non-reusable. The first time I changed L’s oil in her car when we were dating, I was doing pull-ups on the breaker bar trying to get the dang plug to turn! The manufacturer recommendation is about 30 ft-lbs. At the time, I was about 180 lbs, give or take 5. My breaker bar is 18 inches.

First Craft.

I had this Pinterest-inspired hallucination that I would create one crafty item per day in 2014. AHAHAHAHA!!! Hillllarious, folks, hilarious. But, I did manage to create something rad with W on the first of the year – so here it is: a little tutorial on how to make an inverted fruit-basket hanging lamp. P1070537

Some background: The people we bought our home from not only vied to tie Kim Kardashian in swiftness of marriage disintegration, but the world record for number of ugly-butt chandeliers in one house. They are everywhere – in each bedroom (chandeliers in bedrooms?!?), in the dining room of course, the hallway, the kitchen, and they actually took the ones from the barn that were hanging there when we toured the house (the only ones we liked). Anywho, not only are they not “us,” but they cast what appear to be giant grey arachnid shadows (incidentally, W’s idea of a good heavy metal band name). Gotta go.

I’d been hemming and hawing over cool lighting for way too long. My cousin, who we lived with in DC over the summer, always had giant Restoration Hardware catalogs lying about, which were good for drooling, but amusingly not in our price range, and I really like the feel of the lighting at Barn Light Electric. But nothing got purchased. Then recently, in Carytown, I spotted several hanging lights made by a local artisan out of non-traditional sources like repurposed baskets. I knew I could recreate those $75-$200 lights myself! In fact, in purge-mode, I had tossed an old hanging fruit basket that I once bought for $1 at a garage sale into our scrap metal pile, which I immediately fished out when we got home.

A quick trip to Lowes (with a 10% off coupon) garnered a 12-ft lamp cord wire ($5.80, only a portion of which I ended up using…more DIY lamps to be made!) and a keyless socket adapter kit ($3.58) that I thought I could string together to make a hanging light (we’ve become trial and error electricians over the last 3 months). I also bought a canopy kit ($4.61), which is a face plate/finial that covers the ugly hole in the ceiling where all the important wiring resides.

P1070523P1070524

First, I debated whether or not to spray paint the basket, which had some rust spots, opting finally not to in the name of “rustic charm” and it being frigging freezing outside. Then I turned the basket upside down and reattached it’s four chains to the bottom, to make an umbrella-shaped hanging wire basket. I cut off the cord’s plug and wired it to the socket. The instructions that came with the cord didn’t actually match the cord, so W did a little sleuthing to find out which of the two wires was the live/hot (sometimes labeled as “black,” in this case it just had writing on it) and which was the neutral wire (sometimes labeled as “white”). I then attached the little brass finial that came with the socket to the underside of the basket after threading the wire through it. I used a piece of the chain to secure the wire to the basket too, at the top where the “X” is made) so that it didn’t swing around. Then we cut the wire slightly longer than the length of the chain so that we had room to make the connections in the ceiling.

P1070528P1070529P1070535

A few quick screw turns and the godawful hall chandelier (really the worst in tarantula-like shadow offenders) was thankfully removed. Then W attached the wires from our new chandelier to those in the ceiling and installed the canopy kit (thread the wire from the hanging lamp through it first, before connecting the wires to the ceiling). Oh yes, and we turned off the circuit prior to all fiddling in the ceiling, of course!
P1070543

Last step was to screw in the vintage-inspired lightbulb I had purchased ($6.28…the most expensive piece!). No degree required! I experimented with threading lace ribbon and strips of burlap through the basket weave, but finally removed them all b/c it looked too hodge-podgy. Plain basket for me!

Oh, I love this little home made chandelier so much – it casts an unobtrusive basket shadow and the low wattage bulb isn’t too bright to look at directly. Total cost of materials: about $20. Boo-ya!

Go make one!!!

This post was shared with Fluster Buster’s creative link-up party.