Replacing the Air Filter(s) In the Civic

Time for another automobile maintenance post for those who are following along. Was able to get this done before starting my new job and before the “heavy” snow arrived. This one is a two for one – the air filter AND the cabin air filter replacement. As most of my auto maintenance posts are, this one uses our 2009 Civic as the example, but this procedure is pretty straightforward and the same basic steps can be followed for most other vehicles.

Different manufacturers recommend different intervals on when to change your air filter. But the easy answer is to replace it when it gets dirty. I’m ashamed as to how long I waited, you can see the pictures below. The reason you need a filter is so dirt, dust, and other particles don’t get sucked into your engine, acting as abrasive little demons shortening the lifespan of your engine. The reason you need a clean air filter is because your engine needs a certain ratio of air (oxygen, really) to gasoline to operate efficiently. If your filter is too dirty then the flow of air is reduced, therefore making your mixture more rich with gasoline, causing you to use more gas than necessary to run your engine. So you want a clean filter.

If you don’t know how dirty the filter is, then take it out and look at it. If you don’t know where the filter is, crack open your user manual, check google, or just look for the tube that looks like it is sucking outside air into the engine. Here is where it is in the Civic:

image

A zoomed in look shows the clamps you have to unclamp:
image

Remove the filter housing, look at the filter, and decide whether it’s dirty enough to replace:

image

Put the new filter where the old one, put the housing back, re-clamp, and you’re done. Take a look at this side by side:
image

The second part of this post involves the cabin air filter replacement. This is important because it keeps harmful particles out of your AC system and also out of your lungs. Check your manual for where it is; it’s normally behind the glove box. Here is the step by step shown in pictures:

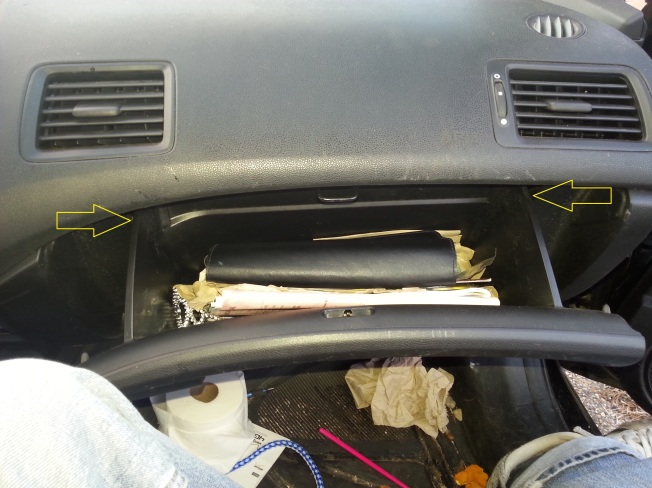
Press the sides where the glove box connects to the dash. Some cars you need a screwdriver or socket wrench:

image

Ensure you have emptied the contents of your glove box or else they will end up on your floor. Behind the glove box is the housing for the cabin air filter. In the Civic, just press these side tabs and pull out.

image

Here’s the old one next to the new one:

image

Make sure your filter is installed properly (look at the arrows on the filter and the housing):
image
image

Pretty simple stuff, huh? Took me about 5 minutes, mainly because I had to stop and snap pictures.

How To Change Your Motor Oil

P1070573
Ok, I know this might be rudimentary for many of you readers out there, however, with the unexpected popularity of my post on changing the third brake light, I figured why not? My reason for writing that post was to reach at least one person to save him or her from unnecessarily spending too much money, so that same reasoning applies here.

If you have never changed your oil before, fear not! This is one of the easiest jobs to do yourself, there is very little risk of screwing things up, and you’ll be able to save yourself a bunch of money! All you need are a few tools, some elbow grease, and about a half hour and you can be a back yard mechanic too. It’s also a great father/son bonding experience (my dad taught me, his dad taught him, I’m sure Sr. taught Jr., and I’ll teach WV when he’s a couple years older).

In this post, I will show you how I change the oil in our 2009 Honda Civic. Different manufacturers (and even different models from the same manufacturer) will have things moved around a bit, but the basic principles still apply. Bottom line up front, here are the steps (explained in further detail below):

Step 1: Elevate the front of the vehicle.
Step 2: Remove drain plug, let oil drain into pan, replace drain plug.
Step 3: Remove filter, let oil drain into pan, replace filter.
Step 4: Refill engine with new oil.
Step 5: Clean up.
Step 6: Check for leaks.
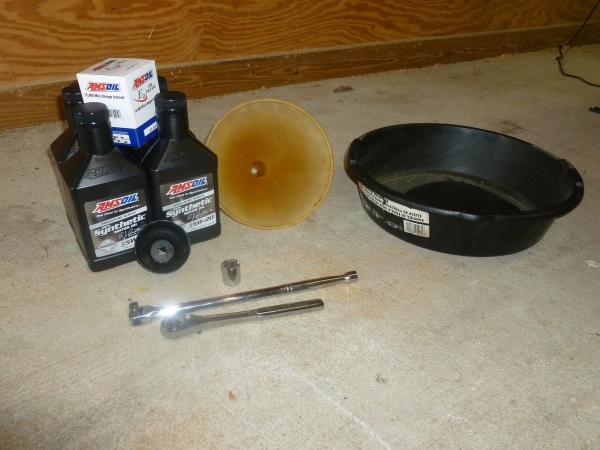
P1070581Here’s a list of what you need:
Ramps or jack stands
Oil pan (that can handle the volume of oil in your engine)
Socket wrench (our Civic takes a 17 mm socket)
Towels/rags
Replacement filter
Replacement oil
Funnel (optional)
Filter wrench (optional)

If you’re not sure what weight/volume of oil or filter type your car needs, consult your owner’s manual. If you cannot find your manual (or the information), then Amsoil has a pretty good app to find out what you need (assuming your vehicle is a 1980 or newer). You don’t have to go with Amsoil for your oil and filter, but the site tells you what your car needs so you can get whatever brand you prefer. Plus, it gives you the option to choose metric or not, so you normal people who use a base 10 measuring system and us silly Americans with our nonsense measuring system can all get the right volumes (1 qt ≈ 0.946 L).

Step 1: Elevate the front of the vehicle. I use ramps. You can get a good pair for around $50, check your local AutoZone/Advance/Pep Boys/etc. Some people prefer to use jack stands, but I think they’re too much of a hassle for changing oil; it’s much easier to set out ramps and drive on up. Heck, you could drive one side of your car onto the curb if you feel like it (and you have a curb). Whatever you do, make sure that the car is secure (parking break on ramps!) before you go crawling underneath it. DO NOT CRAWL UNDERNEATH THE CAR IF IT IS ONLY SUPPORTED BY JACKS. Get yourself some jack stands or ramps, it’s not worth the risk to save a few bucks and be crushed by a car.
P1070574

Step 2: Make sure the engine is warmed up, but not hot. If you’ve been driving around, put the front end up and let it sit for a while. The oil can get really hot and burn your hands. On the other hand, if it’s really freaking cold outside and the oil has just been chilling (literally) in your engine, then you want to crank the engine and let it run for a bit so the oil flows a little better. Position your oil pan underneath the drain plug, keeping in mind that the laws of physics (gotta love fluid dynamics!) will ensure that the oil will initially shoot farther in the x-direction (using the ground as the x-axis, x = 0 is the point on the x-axis directly below the drain plug) and the stream will gradually move back towards x = 0 as the engine drains. It doesn’t matter which way you define as positive, you don’t want the oil to overshoot the pan. Loosen the drain plug with the socket wrench, and then slowly twist it out with your fingers, keeping pressure against the plug so it doesn’t shoot out and get lost in the oil pan.
P1070580

P1070582

Once the oil is done draining, clean up the drain plug, clean around the area where the drain plug goes, and screw it back in there (you can use a torque wrench, but a normal-strengthed person with a normal socket wrench will most likely not over-tighten the plug). Some peoplemanufacturers recommend replacing the drain plug each time you replace the oil. Some cars also have a crush washer that goes between the oil pan and the drain plug that crushes (hence the name) when you tighten the plug and prevents the plug from getting even tighter. Manufacturers also recommend to replace these each time*. The first time I changed the oil in the Civic, I threw away the crush washer. I am still using the same drain plug. See any evidence of leakage in the picture above?

Step 3: Using the filter wrench (or a leather belt, or your hands if you’re Paul Bunyan), loosen the filter, then slowly twist it out using your hand(s). Be sure to keep pressure in the opposite direction, though, otherwise as soon as that filter comes free of the threads, it will slip out of your oily hands and plop right into your oil pan, splashing oil everywhere (yes, I know this from experience). Let the oil drain out of there, wipe out around where the filter screws in, then dip your finger into the used motor oil and spread it around the new filter’s gasket (to ensure a proper seal), and screw the new filter into place. I normally go hand tight (not so I’m straining) plus 1/4 turn with the wrench. Look at all that nastiness from the winter roads on the filter…
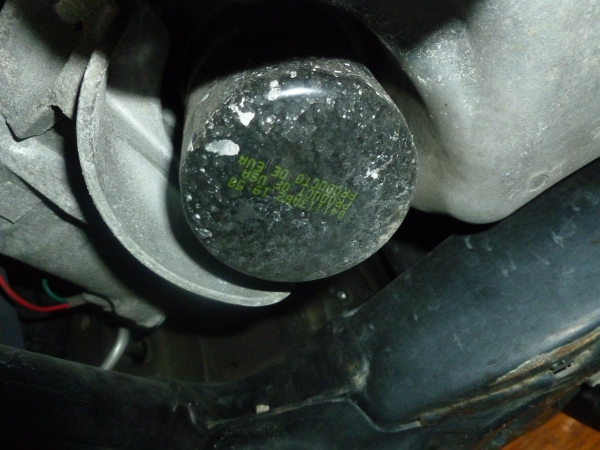
P1070579

Step 4: Double check that you put the drain plug back in (again, speaking from experience). Locate on your engine (under the hood) where the motor oil goes, and unscrew the cap. Using a funnel (or very steady hands), pour the new oil into the opening. My grandfather (and father, and now me) always said “You pay for the oil in the bottom of the bottle,” so I let the bottle sit there and REALLY drain. Screw the cap back on, close the hood, and you’re good to go.
P1070583
P1070585

Step 5: Clean up. I transfer the used motor oil into an older container (you could even use the oil bottles you just emptied), stuff the old filter with paper towel, put it back in the box, and put it in a plastic bag with the hole facing upwards so residual oil doesn’t come out. Most shops and municipal waste collection facilities can recycle old oil and filters for you – call around and check. And look at how clean that new oil is compared to the old!

P1070587 P1070588

Step 6: Bring the front end of your car back down to the ground, crank it up, check for leaks. I normally let the engine run for about 10 minutes, check underneath for leaks, then check the level with the dipstick. If I did it right, I’ve got the exact level of oil I need. If I didn’t, I either need to drain some or add some (it’s a lot easier to add, so better to undershoot). Take it for a spin (or just leave it running for a few minutes) and come back and re-check for leaks.

I will say, I’m so glad that I finally have my own garage. For the past few years I have had to change the oil (and do all other car maintenance) completely outside. And it always seemed like I chose the windiest day of the year to change the oil. Now I can do my work INSIDE A GARAGE and be somewhat protected from the elements. And eventually I’ll insulate it so I can stay warm in the winter and cool in the summer!

It’s entirely up to you whether you want to use conventional or synthetic oil in your vehicle. I use synthetic, since the Amsoil synthetic is good for 25k miles or 1 year, whichever comes first. A little more expensive up front, but the savings do add up. For full synthetic and the filters (the Amsoil filters for the Civic are only good for 15k miles, so I get two), the total cost comes out to about $60. That’s it. For the entire year. Most shops (at least around here) charge between $20-$30 for a conventional oil change, which has to be done every 3,000 miles. If you drive 15k miles in a year, that’s between $100-$150 you’re spending a year on oil changes. If you’re driving 24k miles a year, you’re up at $160-$240 a year. Even with the up front cost of buying ramps ($50) and tools ($10-$20) you’re spending less in that first year, and the savings add up for each subsequent change. Not to mention saving you the hassle of dropping your car off, waiting, or getting someone else to pick you up and bring you back, and losing the whole day.

So if you’ve never changed your own oil before, go ahead and give it a try. It’s not terribly difficult, and it’s really hard to screw it up. It takes less time and money than taking it to the shop, and it gives you that nice sense of accomplishment of doing something yourself and sticking it to the man!

———————
*I have a hypothesis that stealerships and garages just take an impact wrench to the drain plug and the crush washer prevents them from torquing (not twerking) so hard that the oil pan cracks. This is also why manufacturers recommend replacing the washer and drain plug, because they know people will torque the hell out of them and render them non-reusable. The first time I changed L’s oil in her car when we were dating, I was doing pull-ups on the breaker bar trying to get the dang plug to turn! The manufacturer recommendation is about 30 ft-lbs. At the time, I was about 180 lbs, give or take 5. My breaker bar is 18 inches.

Three Gigs and a New Heater Core

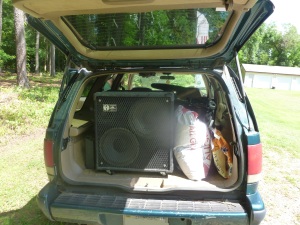
P1060133What a busy past few days. Thursday was spent finishing the job I had started almost a month ago (tough to find time on the weekends, weekday evenings are too buggy) of replacing the heater core in the Blazer (thanks to my good friend and band-mate TB for helping me find screws and bolts I overlooked). It was a royal P.I.T.A. Chevy did not make the dash removal process very user friendly – no wonder it costs an arm, leg, and your firstborn child to have the stealership or a mechanic do the work. Unfortunately, I did not take pictures from the get go, but I did include a few that I snapped throughout the process. The Haynes manual was pretty good on this one. I decided not to put EVERYTHING back together… it was way too hot outside (don’t have a garage), the bugs were getting bad, and I really don’t care that much about the plastic crap covering up the underside of the dash. I use the Blazer for hauling band equipment to gigs, garbage/recyclables to the dump, transporting large items such as sofas or tables, storing things in it because we have zero closets, and occasionally towing a trailer. Do I really need that plastic crap covering up the underside of the dash for these purposes? The above pic is what the inside of the Blazer normally looks like (it is our storage unit… bass amp, chicken feed, and a jogging stroller can be seen in this image). Here is a quick step-by-step process:

1. Remove the dash (including the underside plastic crap, and lower the steering column). I disconnected the battery and also disconnected the connection to the airbag. Don’t want a surprise deployment… There are about 943,051 bolts and screws that need to be removed, and when you think you’ve removed them all you probably haven’t. I think we used Torx, 7mm, 5.5mm, 5/16″, 1/2″, and 17/32″ bits for this process.

P1060134P1060135

2. Drain the radiator. Getting to the drain plug is a bit of a chore, so I just disconnected the lowest hose and let it drain from there.

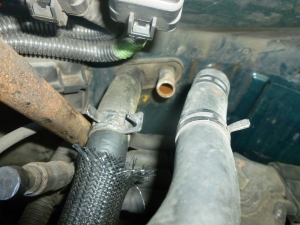
3. Disconnect these 2 hoses going to the heater core (I got the first one, and L got the second much more quickly since she has a Ph.D. in hose connecting/removal).
P1060136

4. Remove the plastic cover inhibiting access to the heater core (I think it was only 6 bolts).
P1060138

5. Remove the metal bars holding the heater core in place, and put the new one in. Put everything back together (or as much as you want to put back together), re-connect all the electrical connections in the dash, put the steering column back in place, fill the radiator, and you’re good to go. Easy, huh?

It was good to spend some time with TB fixing the car, gave us some good old fashioned male bonding time. And L made us delicious sandwiches with tomatoes and cukes from the garden. Thursday evening was a nice night of playing music on the Crab Deck and watching the fireworks across the river from Yorktown (mere feet from the location of the British surrender, essentially guaranteeing American independence – are we really free though?). I love doing outdoor acoustic gigs – L and WV can come and not be blasted away by the walls of speakers, it’s a lot less physical energy expended on my part, and I don’t come home at 3am smelling like an ash tray (although this is rare since Virginia banned smoking in most bars/restaurants in 2009). Don’t get me wrong, I love cranking my amp to 11 and watching drunk people dance the night away at bars, but I’m not as young as I once was and I have responsibilities that I didn’t have 6 or 7 years ago.

GloucesterYorktown_But just because we were playing a low key acoustic gig at a fancy yacht club restaurant, don’t think it was all Sperry shoes, khaki shorts, and white/pastel Polo shirts. We had a little bit of everything there: Drunk dude showing up around 7:00 (by boat…), trying to keep himself somewhat perpendicular to the floor, loving every minute of us playing, tipping us quite well), and then getting into his boat to weave his way around $1,000,000 yachts docked and the families coming back from watching the fireworks on the river. Thankfully, management handled it well and didn’t let him drive his boat home. Salty old owner telling us we were too loud (turns out we’re not special, he acts the same towards everyone). Standing room only crowd in the parking lot to watch the fireworks (the Gloucester crowd doesn’t like to deal with the traffic and tourists in Yorktown on July 4… I don’t blame us/them). I wanted to get a couple pictures, but L accidentally left the camera at home charging. Oh well.

Friday, I got my hours in, then met up with the rest of the band for a 3 hour drive down to Lake Gaston for another gig. Outdoor rock and roll with Key’d Up. We were literally out in the middle of nowhere. My droid couldn’t find it. TB’s iPhone couldn’t find it. But for some reason our drummer’s “dumb” phone was able to find it. We rocked for about 4 hours, and the cops only came out twice!

P1060203Saturday we finished our little mini tour right where we started. Another acoustic evening on the Crab Deck, watching the sun go down while enjoying a cold beer or two (or three). No crazy shenanigans this time, although the salty old owner was having a discussion with the manager (manager is totally cool, btw) about how he thought he had kicked us out last time… Anyway, we weren’t kicked out, and we rocked the place again (albeit at a slightly lower decibel level than on July 4). Here’s a pic of WV enjoying a lime and another one of L and WV enjoying the music:

P1060208 P1060225

Replacing the Third Brake Light – 2009 Honda Civic EX Coupe

DO NOT TAKE YOUR CAR ANYWHERE TO GET THIS DONE! IT IS SUPER EASY!

“But I don’t know anything about cars, I’m too afraid that I might mess something up and then have to take it to the shop to get more work done,” you might say. Fine with me – you’re not spending my money. But doing your own work on your vehicle, even if you’re not a mechanic, saves you a TON of money* and gives you a sense of satisfaction and accomplishment. And I’m not saying don’t ever go to a shop. There are things I can’t do, I don’t have the necessary tools, I don’t know how to weld, etc. Definitely support your local businesses, but support yourself too. Mechanics have to put food on the table for their families, but you have to keep food on the table for your family.

So here’s the story: I take my 2009 Civic in to get new tires installed. I don’t have the necessary tools to mount the tire on the wheel, so that’s one of the instances I take it to the shop. My inspection expires this month, so I say go ahead and inspect it while it’s there. Normally I check everything myself before I take it in so I can fix whatever’s wrong before it fails, but it was already there and it’s a 4 year old car, I figured I was safe. WRONG. The third brake light (the one in the middle above the trunk) was out. And Honda has decided they need to make more money, so instead of replacing a bulb like you would do in any normal car, you have to replace the entire LED strip. And you HAVE to get it from Honda, as AutoZone does not carry it. The shop wanted $175. $90 for the part, $85 for the labor. Holy cow!

They said it was so expensive because they had to entirely dismantle the rear portion of the car and it’s a very time intensive process ~ around 2 hours. I figured if it takes a mechanic 2 hours, it will take me 4 (or 8, or 2 weekends…), so I waited until I had a free afternoon to take care of it. That afternoon was this past Sunday. I dropped off my thesis to get bound on Saturday morning, then on the way home went to the Honda stealership to pick up the part so I would have it for the next day. It looks like a cheap piece of plastic that some 5 year old Chinese kid made for a total cost of about $3.87, but it cost me $88.59 after tax.

L and I had spent the hottest part of the day in the garden, which was good because I could wait until it cooled down a bit before I started my auto repair work. (I hate having to crawl around under an engine, under the hood, or contorting my body to squeeze into the back of the 2-door Civic and work with tools while I’m dripping in sweat.) My Haynes manual didn’t have anything about replacing the third light (second time they have failed me – first was when I was replacing L’s timing belt in her 2007 Accent), so I did a quick online search and found a text-based walk through on a Civic forum. This post, however, is complete with pictures and my own snarky “humor”. So enjoy!

1. Remove the jogging stroller from the trunk.

2. Lay down the back seats, feeding the center seat belt through the slit so the seat lays down easily.
P1050277

3. Disconnect the wire that leads to the brake light. This is the view from inside the trunk, looking up.
P1050280 - Copy

4. There are indentations on the front of the rear panel. This is where the panel attaches itself to the rest of the car. Put your fingers under there and pry up. It pops off easily. Don’t break anything (on the car or your body).
P1050278 P1050279

5. The wire that you disconnected from the wiring of the car is still attached to the body. See the little plastic thingy sticking up in the picture below? (You should, it’s circled.) Squeeze it and feed the wire through the hole.The panel is also attached near the rear windshield. Apply a little bit of pressure back there as well, and lift the panel.
P1050283 - Copy

6. Get out of the car, turn the panel over, and remove the screws attaching the speaker protector to the panel.
P1050285 - Copy

7. Remove the non-working LED strip, replace it with the new one.

8. Put everything back together, connect the wire, drink a celebratory beer.

Total time: ~5 minutes.

I then proceeded to make a chocolate cake, which took way longer than replacing the brake light.

A side note: I was fully expecting this to take all afternoon, not 5 minutes. This prohibited me from fixing it right away and bringing it back the next day for re-inspection (in the middle of the month). I ended up having to wait almost 3 hours on 4/29 because of everyone else waiting until the last minute. Chalk this up as another life lesson and add it to the list of reasons why I find it extremely difficult to trust mechanics. Had I allowed them to do the work, would they have been honest and tell me that it only took 5 minutes so they were not charging me the quoted price? Or would they keep that their little secret and pocket that extra cash? It sickens me to think of the latter, and to think that so many nice, well meaning people get taken advantage of by sneaky sharks trying to make a buck.

If you still find yourself reluctant to do the work, bring me your car, the part(s), and something awesome (beer/pie/bratwurst/baseball tickets/baby sitting promise) and I’d be more than happy to do it for or with you!

Join me next weekend (or next next weekend, or next next next weekend) when I replace the heater core in my 1997 Blazer!

———————————————————-
*1 ton of pennies = $3,628.74, rounded to the nearest cent.
*1 ton of nickels = $9,071.85, rounded to the nearest nickle
*1 ton of dimes = $39,999.30, rounded to the nearest dime
*1 ton of quarters = $39,999.25, rounded to the nearest quarter
*1 ton of half-dollars = $39,999.50, rounded to the nearest half-dollar
*1 ton of dollar coins = $111,998, rounded to the nearest dollar
*1 ton of dollar bills = $907,185, rounded to the nearest dollar (each US bank note, regardless of denomination, weighs 1 gram. You can figure the rest out from here…)

Ack! Don’t forget to label bottles!

Our car is a mess. A complete mess. Whenever we drive to see either of our parents, I always make sure that I clean it out for fear of one of our moms saying “Wow, you really need to clean out your car!” It’s not disgusting/unsanitary – no moldy growths from food scraps or anything – just full of papers, junk mail, an empty seltzer can or 5, coffee mugs, etc. So before we pack up the car with 13 loads of laundry, I go outside with 2 bags – one for the recyclables and one for the trash. Which normally turns into 4 bags. Sometimes 7. And then 2-3 trips back to the house carrying in coffee mugs or water cups. But it’s “clean.” I never have time (or the desire) to vacuum, wash the windows, wipe the dash, hose off the rubber floor mats, etc. Getting the trash out is enough.

But it never fails – whichever house we go to, the respective mom almost ALWAYS make some direct or indirect statement about the cleanliness of the vehicle. If only they could see a before picture…

So the other day, L decided that while I was working with one eye on my computers and the other eye on WV she would REALLY clean out the car. She removed ALL of the crap that was inside, vacuumed, washed windows, the whole works. The only thing she didn’t do was wash and wax the exterior (lazy, right?). She even found a bottle of windshield washer fluid and refilled the reservoir because it was bone dry! What a keeper! I didn’t even think we had any washer fluid because I distinctly remembered finishing off a bottle last summer and didn’t recall going to the store to buy more.

Later that night, I took the dogs out for a walk and noticed a windshield washer fluid bottle on the floor of the entryway that had a tiny, tiny bit of a fluorescent yellowy liquid in the bottom of it. While we were on the walk, the wheels in my head began to turn. I’ve never seen fluorescent yellowy windshield washer fluid. And as mentioned before, I didn’t even think we had any. What could it be?

Not Washer Fluid Aha! Last summer, I flushed the radiator of L’s car before we sold it! And since I’m frugal, I don’t buy the 50/50 solution for $10.99, I buy the same volume of fully concentrated stuff for $12.99 and cut it with water. But to be able to make my own 50/50 mixture, I have to pour 50% of the fully concentrated fluid into another receptacle, then add water to both. The empty container that I had at the time was an empty washer fluid container. I figured that since I take care of all the routine maintenance things, I’ll take one look at the bottle and know instantly that it’s not washer fluid when I see it at a later date…

I got back from walking the dogs, then came upstairs to tell L my discovery. She was feeding WV, and I walked into the room and said “I made a mistake a while ago that you unknowingly perpetuated.” She was completely confused and had no idea what I was talking about. I explained to her the situation, and that it was entirely my fault, that I should have labeled the container. She felt so bad though. She had been extremely helpful in cleaning out the car, and then going above and beyond to refill the washer fluid reservoir! How was she supposed to know that the liquid inside the bottle that said windshield washer fluid was not, in fact, windshield washer fluid?

I did a quick search to see if anyone had done this before and what could be done to fix it. I was prepared to completely disassemble the entire washer fluid system. Most of the posts in the search results were of the opposite problem – washer fluid in the coolant overflow reservoir. But nestled in the second page of results was a little post from our friends at Car Talk explaining what to do. Click and Clack save the day, again!

$1.62 for some flexible tubing for siphoning (not using my beer siphoning equipment) and a few minutes of letting gravity do it’s work and the reservoir was empty. And I didn’t have to take anything apart! (Getting to all of the components was going to be doable, but difficult and time-consuming). Refilled with windshield washer fluid, and now I’m good to go! (And if you ever need to siphon anything that you don’t want to ingest, PLEASE pre-fill the siphoning tube with water and let the water flow start the siphon)

So the moral of the story is that communication is key. Whether it’s written or verbal. Or nonverbal, for that matter, if you’re competent enough to know exactly what your wife is thinking without her having to say it. It would have taken me mere seconds to cross out “Windshield Washer Fluid” and write “50/50 Antifreeze” on the bottle, and would have saved a lot of time (not to mention the antifreeze/water mixture that I took back to the auto parts store for proper disposal). Could I have used that fluid again, or was it more advisable that I take it back to the store for disposal?

And now, a little joke to tie it all together:

Q: What’s the last thing that goes through a bug’s mind as it crashes into your windshield?

A: It’s ass.